Spotify Playlist Analyser
Spotify provide an API that allows programmatic access to all their music data, playlists, and user information. This project utilises the Python package spotipy, which wraps up the underlying API into a convenient Python object, in order to generate some statistics about the playlists of a user.
The results of the analysis, navigation buttons, and user input fields are displayed in a web GUI written in HTML using Flask and Jinja templates styled with CSS. The app is deployed to Heroku where it can be used online from any device.
Python 3.6, VSCode, and Google Chrome on Windows were used for all the coding, debugging, and testing.
Links
- Heroku – jax7er-playlist-analyser web app
- GitHub – SpotifyPlaylistAnalyser source code
- PyPI – spotipy
- PyPI – Flask
- Jinja
- VSCode
Contents
Setup
Virtual environment
The Flask documentation recommends using a virtual environment when developing a web app. This allows the project to use a specific set of packages with specific versions without causing any compatibility issues with any other projects, which makes it a good practice in general. Python 3 comes bundled with the venv package for creating virtual environments. Navigate to the main project directory and run the following command in a prompt:
python -m venv env
This creates a virtual environment in the directory ./env. Using env as the directory name is a convention. Once this has completed, the virtual environment needs to be activated by running one of the activate scripts as follows:
./env/Scripts/activate.{ext}
Replace {ext} with bat if using command prompt or ps1 if using Powershell. The prompt should now be prepended by (env), for example in Powershell:
(env) PS C:\path\to\project\directory>
In order to get the VSCode IntelliSense to work properly, some changes need to be made to the settings. In VSCode open settings using the keyboard shortcut Ctrl+, (Control + Comma) then add the following lines into the Workspace settings file:
“python.pythonPath”: “${workspaceFolder}\\env\\Scripts\\python.exe”,
“python.linting.pylintPath”: “${workspaceFolder}\\env\\Scripts\\pylint.exe”
Packages
With the virtual environment activated, the required packages need to be installed. These are: pylint, a linter for Python; spotipy, the wrapper for the Spotify API; Flask, the web app framework; and gunicorn, required for deploying the app to Heroku.
Enter the following commands into the prompt to install the packages (you can copy and paste the text):
pip install pylint
pip install spotipy
pip install Flask
pip install gunicorn
Spotipy
Credentials
There are two ways to authenticate requests made with Spotipy, known as Authorisation Flows: the Authorisation Code flow and the Client Credentials flow. The former requires a user to log in with their account details through a redirection URI and is useful for long running applications that require access to a user’s private account information. For simplicity, this project uses the latter flow; no user information is needed as only public playlists will be analysed.
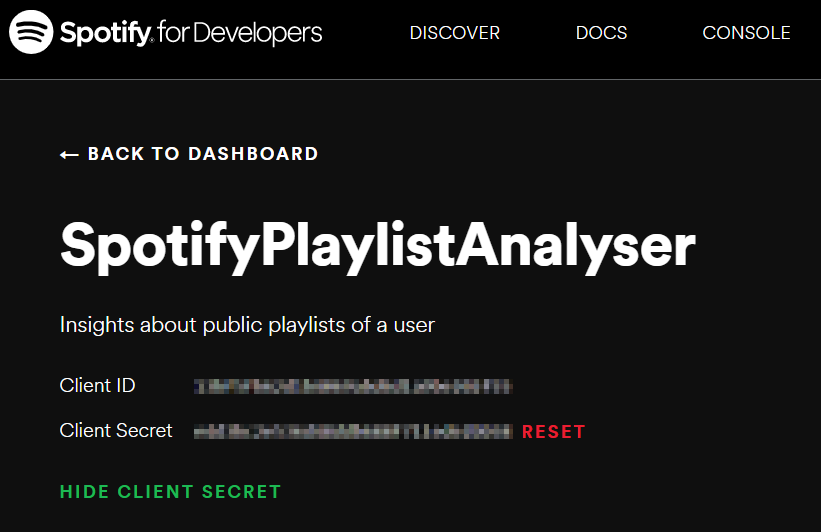
An app needs to be created on developers.spotify.com in order to obtain the Client ID and Client Secret codes. These codes are what Spotipy uses to authenticate its requests. They have been obfuscated here and not hard-coded in the Python script for security. Instead, they are stored in environment variables and loaded in at runtime.
from os import getenv
from spotipy.oauth2 import SpotifyClientCredentials
from spotipy import Spotify

spotify = Spotify(
    client_credentials_manager=SpotifyClientCredentials(
        client_id=getenv("SPOTIFY_CLIENT_ID"),
        client_secret=getenv("SPOTIFY_CLIENT_SECRET")
    )
)
Here, the codes are explicitly loaded and passed to the SpotifyCredentialsManager constructor, however if stored in environment variables with the names SPOTIPY_CLIENT_ID and SPOTIPY_CLIENT_SECRET respectively, the constructor can be called with no arguments.
The spotify object is created with the credentials manager. This is the main object used to interact with the API and contains all the methods to retrieve information from Spotify.
Methods
The main methods needed for this project are the ones relating to the retrieval of playlist information. Assuming the username of the desired user is stored as a string in the username variable, the user_playlists() method is used to retrieve their public playlists.
from spotipy.exceptions import SpotifyException

try:
    playlists = spotify.user_playlists(username)
except SpotifyException:
    playlists = None
If the username exists, the call will return a dictionary containing information about the user’s playlists, otherwise it will raise a SpotifyException.
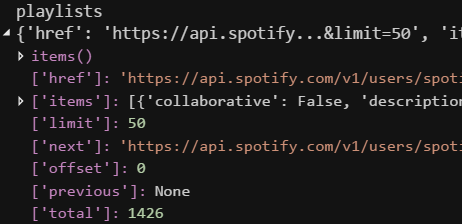
This is the structure of the returned playlists dictionary. Some of these elements are common to many of the dictionaries returned by the Spotipy calls, such as "total", "items" (not the dictionary method items()) and “next”. The "items" element maps to a list of dictionaries each representing one of the user’s playlists.
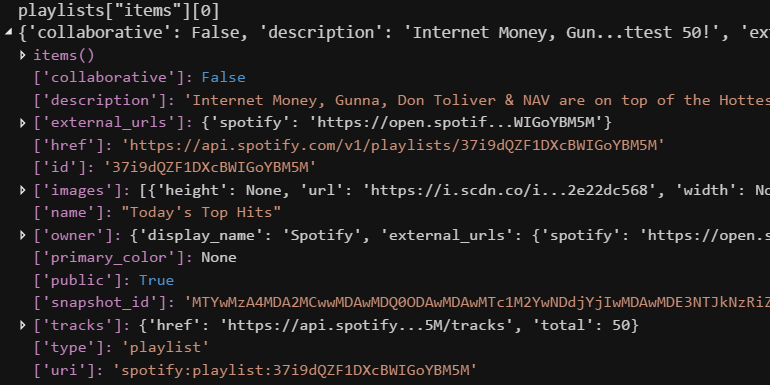
This is the structure of the first element of "items". The "id" element maps to a unique identifier for the playlist that can be used to retrieve the full track listing using another Spotipy method.
The "next" element in the playlists dictionary is a string which represents the call to make to the API to retrieve the next page of information, if there are more, else None. In this instance where “spotify” was used as the username, it maps to a string as not all the playlists have been retrieved, note the "limit" of 50 and the "total" of 1426. The "next" element will be used when retrieving all the tracks in a playlist.
The next method required is next(), which returns the next page of information based on the "next" value of an existing result. There is a default limit of 100 tracks in a single page so if there are more than this the "next" element maps to the appropriate API call string. If the value of "next" is None, then the next() method also returns None.
while playlists is not None:
    for playlist in playlists["items"]:
        # do some analysis...

    playlists = spotify.next(playlists)
In the code above, all playlists owned or followed by the user will be analysed. It’s possible to only consider those playlists created by the user by adding the statement if playlist["owner"]["id"] != username: continue at the start of the loop. The opposite condition could be used to filter only followed playlists.
To get all the tracks in a playlist given its ID, we can use the playlist_tracks() method:
tracks = spotify.playlist_tracks(playlist["id"])
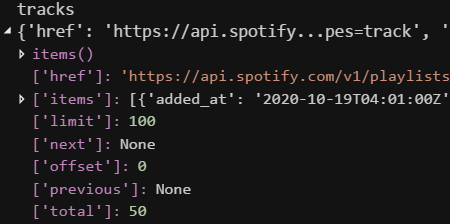
The tracks object contains all the information about a playlist’s track listing and has a structure identical to that of the playlists object.
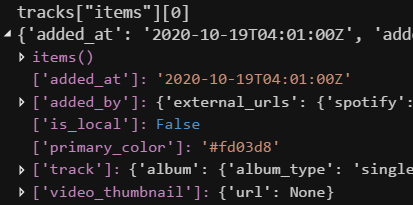
Digging into the first element of "items" list reveals more information about the first track in the context of the playlist.
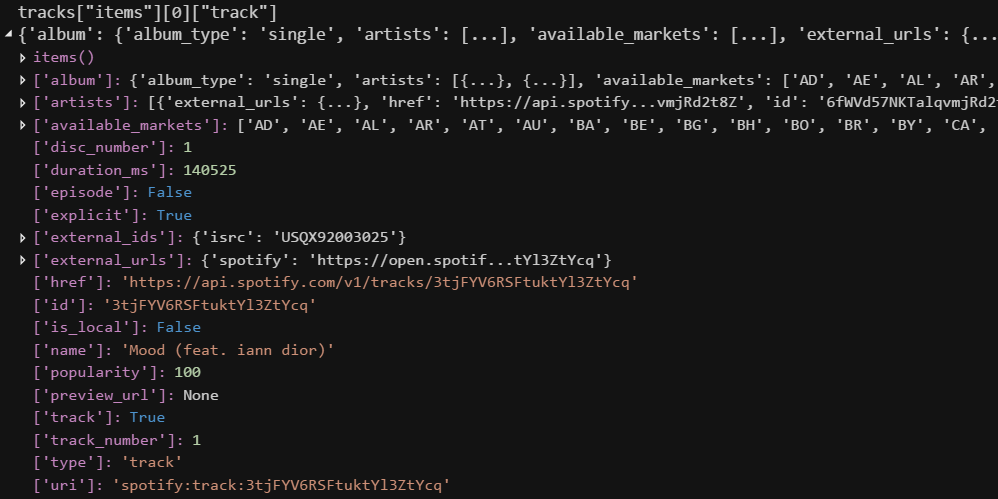
Furthermore, the "track" element contains a dictionary with information about the track itself, independent of any particular playlist.
Analysis
Top Artists
One task would be to find out which artist(s) featured on the most tracks in the playlist. This can be done with the help of a Counter object from the standard collections module. This is a dictionary subclass that takes an iterable with hashable elements as input and keeps track of the number of times it encounters each one. Strings are hashable, so it’s possible to feed in an iterable of artist names and count the number of occurrences of each. The name of each artist in each track is buried in the structure of the tracks dictionary in the following way:
tracks["items"][track_i]["track"]["artists"][artist_i]["name"]
We can create a generator that steps through each of the artists in each of the tracks and returns their names. The "track" element of each track can have a value of None so it’s also necessary to check this is not the case in the generator. Passing the generator to the update() method of the Counter adds an element with a key equal to the artist’s name and a value of 1 if it doesn’t yet exist or increments the existing value by 1 if it does.
from collections import Counter

artist_count = Counter()

while tracks is not None:
    artist_count.update(
        artist["name"].strip()
        for track in tracks["items"]
        if track["track"] is not None
        for artist in track["track"]["artists"]
    )

    tracks = spotify.next(tracks)
If the tracks dictionary is None, there are no tracks in the playlist, meaning artist_count will remain an empty dictionary. We can create a variable to hold the maximum number of tracks featured on by any artist by finding the maximum of artist_count.values(). From this, it’s possible to create a list of artist names who feature on this many tracks using a list comprehension iterating over the artist_count.items() adding those that have a count equal to the maximum number of tracks. A maximum number of artists can be set to avoid huge lists of names for playlists that have many top artists, with the excess artists replaced by a single message.
if artist_count:
    top_count = max(artist_count.values())

    top_artists = [
        x for x in artist_count
        if artist_count[x] == top_count
    ]
    top_artists.sort(key=str.lower)

    max_artists = 10

    if len(top_artists) > max_artists + 1:
        excess = f"{len(top_artists) - max_artists} others"
        top_artists = [*top_artists[:max_artists], excess]
else:
    top_artists, top_count = [], 0
The if statement checks whether the number of top artists is greater than one more than the maximum to avoid appending the excess message when there is only a single artist too many; we may as well just include the final artist’s name rather than the message. The top artists and the number of tracks they each feature on are now stored in the top_artists and top_count variables respectively.
Duplicate tracks
Another useful insight would be whether a playlist has any duplicate tracks as it may be desired that only one instance of each is included per playlist. This is a little bit more tricky than counting artists’ names as multiple artists may have tracks with the same name. We need to create a unique key for each track based on its meta data: the track’s name and the names of the artists who it’s by. If we want to treat the same track on different albums as different tracks we can include the album name in the key too. The artists’ names can be sorted so that the key is independent of their order.
A dictionary of all the meta keys can be kept, each mapping to the full meta data and a count of its occurrences. For each track, its meta key is built and checked for membership in the all meta dictionary. If it exists, we increment its count and add the album to the list of albums where the track has occurred, else a new element is created in the all meta dictionary with a count of 1.
include_album = False
all_meta = {}

while tracks is not None:
    for track_item in tracks["items"]:
        if track_item["track"] is None:
            continue

        track = track_item["track"]
        name = track["name"].strip()
        artists = [a["name"].strip() for a in track["artists"]]
        artists.sort(key=str.lower)
        album = track["album"]["name"].strip()

        meta_key = "".join([
            name,
            *artists,
            album if include_album else ""
        ])
        item = all_meta.get(meta_key)

        if item is None:
            all_meta[meta_key] = {
                "track": name,
                "artists": artists,
                "albums": [album],
                "count": 1
            }
        else:
            item["count"] += 1

            if album.lower() not in map(str.lower, item["albums"]):
                item["albums"].append(album)

    tracks = spotify.next(tracks)
Once we have all the metadata stored in the all_meta dictionary, the last step to find the duplicate tracks is to filter only those values that have a count greater than 1.
duplicate_tracks = [
    x for x in all_meta.values()
    if x["count"] > 1
]
The duplicate_tracks variable now contains a list of dictionaries, each containing the metadata and occurrence count of each duplicate track.
Jinja
Jinja2 is a template engine for Python that allows for HTML web pages to be generated based on templates. It includes a Python-esque language that is written directly alongside the HTML to programmatically generate elements, such as conditionally including them or creating multiple elements in a loop. Flask uses Jinja2 internally to generate web pages through the use of the render_template() method.
Folders
There is a standard folder structure that ensures the static content and dynamic templates can be found, and are named as you might expect.
The static folder contains any files are not dynamic, i.e. ones that do not have dynamic elements. This includes CSS files for styling pages, favicons (the small images that appear in tabs and on bookmarks), and other images/animations like loading GIFs. Files in this folder are easily addressed using the Flask function url_for() (discussed later) with the following format (for a file called name.ext):
url_for(“static”, filename=”name.ext”)
For example, a loading spinner GIF can be added to a web page template by using the following HTML code and having the GIF stored in the static folder with a filename of loading.gif (the function of the double curly braces is explained in the next section):
<img src="{{ url_for('static', filename='loading.gif') }}">
The templates folder is where all the web page templates live. A template is a simple text file with HTML and/or Jinja code inside describing the elements to display.
Constructs
There are many Jinja constructs that can be used to create conditionally generated elements, some of the common ones used in this project are shown in this section.
The most basic construct is the expression. This is written using double curly braces as delimiters and optionally a single padding space for readability. The text between the delimiters is evaluated and the result is inserted wherever the expression appears in the webpage.
{{ first_name }}
{{ ", ".join(top_artists) }}
{{ 3*x**2 + 2*x + 1) }}
Other constructs use a single curly brace followed by a percent sign as a delimiter rather than a double curly brace (the optional space is still allowed). They also need a closing tag after the content they contain, typically in the form of {% endconstruct %}. Expressions can be used inside without the need to include the double curly braces shown above for the pure expression construct.
A conditional construct is used to include content depending on the value of an expression.
{% if x > 1 %}
  <p>{{ x }} is greater than 1</p>
{% else %}
  <p>{{ x }} is less than or equal to 1</p>
{% endif %}
A loop is used to create multiple copies of the contained content with the ability to modify it based on the loops variables.
{% for postcode in postcode_list %}
  <p>{{ postcode.upper() }}</p>
{% endfor %}

<table>
  {% for user, name in user_dict.items() %}
    <tr>
      <td>{{ user }}'s name is {{ name }}</td>
    </tr>
  {% endfor %}
</table>
Blocks can be used to define named sections in a template. These can be overridden when other pages inherit from it using the extends construct.
{% block header %}
  <title>Home</title>
{% endblock %}

{% block footer %}{% endblock %}
Extends can be used to inherit from the template in the given file. Any blocks defined in the parent page are overwritten by blocks of the same name.
{% extends "parent.html" %}
Auto-redirect
A useful line of Javascript to include at the end of the body of a template is the following to perform an automatic redirect to the url specified:
<script>window.location.replace("{{ url }}")</script>
One use case is when there’s a long running process that needs to be performed on the server side and you want to show the user a loading screen to provide a better experience while they wait. This script would be included in the template for the loading screen with the url pointing to the page to redirect to when the process has finished. An added benefit of using window.location.replace() is that the loading screen doesn’t get added to the history so if the user clicks their browser’s back button they will be returned to the page before the loading page.
Flask
Flask is responsible for running the server in the background, routing users’ requests, processing results in Python, generating web pages, and sending them back to the user.
Setup
The first step is to import the Flask class from the main flask module and create the app variable by instantiating an instance of it. This can take any name but by convention app tends to be used. The __name__ attribute needs to be passed into the Flask constructor.
from flask import Flask

app = Flask(__name__)
All that’s left to do to start the server is call the app.run() method and optionally surround it with the if __name__ == "__main__" construct.
if __name__ == "__main__":
    app.run(debug=True) # local debug server
    # app.run(host="0.0.0.0") # externally visible server
After this code is run, the server will be running locally, at localhost, on port 5000, the default. To access it, navigate to http://localhost:5000 in your browser.
The server will respond with a “404 Not Found” error. This proves the server is running but isn’t particularly useful, we need to actually tell the server to return some web pages.
Routing
To respond to a request from a user, a function needs to be written that generates and returns content. This function is decorated with the app.route() decorator with a parameter equal to the corresponding text entered in the address bar. The function name is independent of the address bar text but conventionally it’s the same. The root page is a special case represented by a single forward slash and conventionally a function called index:
@app.route("/")
def index():
    return "This is the root page"
Re-running the server with this included replaces the error in the previous section with a page containing the single line “This is the root page”.
In general, to add a new page:
- Define a function that returns the right content
- Decorate the function with
@app.route("/{url_text}"), where{url_text}is what you type in the address bar
The code below displays “This is another page @ /page” in the browser when a user navigates to http://localhost:5000/page:
@app.route("/page")
def page():
    return "This is another page @ /page"
The decorator also allows the function to grab data that’s present in the address bar by using Variable Rules to surround a name in triangle brackets and then adding an argument to the function with the same name. By default, the data is a string, but it’s possible to specify numeric data by prefixing the name with with int: for an integer or float: for a floating point number. The code below shows an example where the function produces different output based on the type of data entered in the address bar. The corresponding text displayed in the browser is shown in the comments:
@app.route("/show/<text>")       # /show/one → "one is a str"
@app.route("/show/<int:text>")   # /show/1 → "1 is a int"
@app.route("/show/<float:text>") # /show/1.0 → "1.0 is a float"
def show(text):
    return f"{text} is a {type(text).__name__}"
Instead of returning content it’s possible to redirect to another page by using flask.redirect() . This is typically used with the flask.url_for() method with the name of the corresponding view function to redirect to passed as an argument. The example below shows how to redirect to the root page after servicing a request to get the /redirect page.
from flask import redirect, url_for

@app.route("/")
def index():
    return "Root page"

@app.route("/redirect")
def redirect():
    # do something useful...
    return redirect(url_for("index"))
The key way Flask interfaces with Jinja is using the flask.render_template() method. This takes the file name of a Jinja template stored in the templates directory and keyword arguments describing the context in which to render the template. The context is what maps the names in Jinja constructs to values. The following example would display “Welcome, Eric” in the user’s browser if they navigated to /Eric.
"""<!-- templates/index.html -->
Welcome,
"""

from flask import render_template

@app.route("/<url_name>")
def index(url_name):
    return render_template("index.html", jinja_name=url_name)
The names used in Jinja constructs and their corresponding keyword arguments in render_template() must have the same names. Conventionally, if the value is stored in a variable in the function, it will also share the same name, but this is not required. The above function uses different names to show the relationships between the different elements, it could be written more conventionally as:
@app.route("/<jinja_name>")
def index(jinja_name):
    return render_template("index.html", jinja_name=jinja_name)
HTTP methods
As part of the HTTP (HyperText Transfer Protocol), there are different types of requests that a user can make. The most common is the GET request, the type that is used when navigating to a web page in your browser’s address bar. Another common request is POST, the type that is made when submitting a web form, typically by clicking a button. Flask has the ability to handle both of these by including the methods keyword argument to the route() decorator with a value equal to a list of strings representing the methods. By default, this is a single element list containing "GET", as we’ve seen from the previous examples as we were able to display those pages by navigating to the relevant page in the browser’s address bar (sending a GET request to the server). Flask also provides the global flask.request object that allows the method to be queried using request.method.
from flask import request

@app.route("/method", methods=["GET", "POST"])
def method():
    return f"Used the {request.method} method"
HTML forms can use the POST request to send data to a server. The data contained in the form can be accessed via the request.form dictionary-like object. The names of the HTML form elements become the keys in the Flask form object. For example, if there was text input field defined as:
<input type="text" name="textbox"/>
The value typed into the text field would be accessible via request.form["textbox"]. The get() method also works as expected if the field is optional.
Request handler
In this project, a helper function was created to simplify handling requests of different types and provide a consistent error message if a request could not be handled. It has keyword arguments of the following type (as per the typing module):
Dict[
    str, # the HTTP method name
    Callable[ # the function that generates a response
        [None], # no arguments
        Union[flask.Response, str] # the reponse
    ]
]
The helper function handle_request() is shown below:
def handle_request(**methods_functions):
    function = methods_functions.get(request.method)

    return function() if function else (
        f"Unhandled method: {request.method}, "
        f"valid methods: {', '.join(methods_functions)}"
    )

@app.route("/handle", methods=["GET", "POST"])
def handle():
    def get():
        return "Used GET method"

    def post():
        return "Used POST method"

    return handle_request(GET=get, POST=post)
Session
Flask provides access to a session cookie that allows data to be preserved between different requests. This is useful when you don’t want to keep asking a user to input some information if they’ve already entered it, for instance typing a username. In order for this to work, a 128-bit secret key needs to be set in the app to enable the signing of the cookie. One way to generate this is to run the following command in a prompt:
python -c “import os; print(os.random(16))”
os.urandom uses a high quality random number source from the operating system. To set the secret key, assign the sequence of random bytes to the app.secret_key attribute. Notice the mix of ASCII characters and hexadecimal values prefixed by \x in the following example:
app.secret_key = b"\xe8n\xd0\xb1M<\x19zI\xd9\x1a[\xef\x8e\xa9\x1c"
The API exposes the session cookie as a dictionary-like object, flask.session. To set some data in the session cookie, assign a value to a key, just like a regular dictionary. To retrieve a value, index the object with a key or use the session.get() method, which allows for a default value in the case the key doesn’t exist, just like a regular dictionary.
The following example page at /value displays a form with a textbox and submit button that creates a key in the session cookie called "key" with a value of whatever was typed in the textbox. When the form submits a POST request to the server, the value in the session cookie is set and then the page redirects to itself, which sends a GET request to the server. The new value is retrieved from the session cookie and displayed before the form, showing the value is preserved between the two requests.
from flask import session, redirect, request

@app.route("/value", methods=["GET", "POST"])
def value():
    if request.method == "GET":
        return f'''
            {session.get("key")}
            <form action="/value" method="POST">
                <input type="text" name="textbox"/>
                <button type="submit">Submit</button>
            </form>
        '''
    else:
        session["key"] = request.form.get("textbox")

        return redirect("/value")
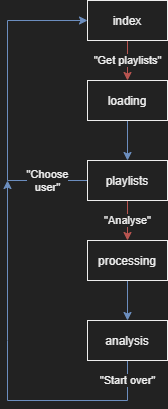
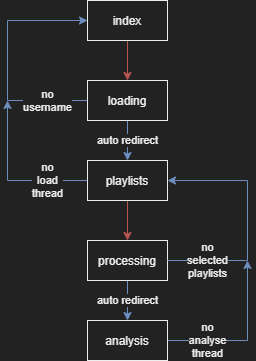
App flow

Heroku
With all the parts of the web app complete and running locally, it can now be hosted on Heroku for accessibility by anyone with an internet connection. Heroku offers a variety of ways to deploy an app, but this project focuses on the GitHub method as it doesn’t require installation of the Heroku CLI.
Files
To prepare the app for deployment, a few modifications need to be made to the project. First, in the main app.py file, the line:
app.run(debug=True)
Needs to be changed to:
app.run(host=”0.0.0.0″)
This disables the debug mode (the debug flag defaults to False) and makes the app listen to requests received externally by setting the host argument to "0.0.0.0".
Next, in order for Heroku to automatically recognise the web app as being written in Python, a requirements.txt file needs to be created with a list of all the project dependencies. The pip freeze command can generate this for us and the result can be stored directly in the file. Run the following command in the same directory as app.py:
pip freeze > requirements.txt
Finally, a file required by Heroku called a Procfile needs to be created. The contents of this describes the commands executed by Heroku to start the app. In the case of this project, it is a single line that starts a Gunicorn web server. Run the following command in the same directory as app.py to create the Procfile (notice it has no extension):
echo “web: gunicorn app:app” > Procfile
The directory tree looks like the following when ready to be deployed:
app.py
Procfile
requirements.txt
static/
├─ favicon.ico
├─ loading.gif
└─ main.css
templates/
├─ analysis.html
├─ async.html
├─ base.html
├─ index.html
└─ playlists.html
With all the files prepared, commit and push them to a Git repository (this requires a GitHub account).
App
A Heroku account is required to host an app. Once logged in a new app needs to be created via the “New” > “Create new app” menu button and a name and region specified. This project uses the GitHub method with Manual Deployment. Select “GitHub” in the “Deployment method” section, connect your GitHub account, and select the repo containing the web app files that should already have been pushed. Under the “Manual deploy” section, select the corresponding branch. The default value of “master” or “main” is likely to be correct if you’ve only created a single branch. Click “Deploy Branch” and wait for the process to finish.
The app uses some environmental variables to store the Spotify credentials and in Heroku-speak these are called Config Vars. Return to the top of the page and click on the “Settings” tab. Under the “Config Vars” section click “Reveal Config Vars”. For each environment variable, enter the key and value and then click “Add”. In the case of this app, the keys are SPOTIFY_CLIENT_ID and SPOTIFY_CLIENT_SECRET.
If the deployment was successful, the app should now be running! Return to the top of the page and click on the “Open app” button to see the app in action.